
Remember those 1272 yards of merino I spun? Well, after I finished spinning it, August was the time for its destiny: the Madder Adventure!
Fiber Preparation
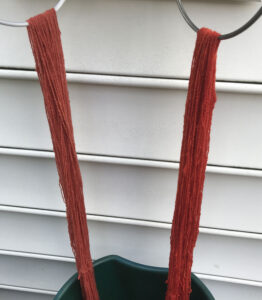
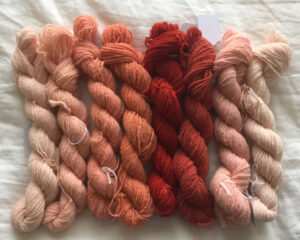
Since I knew madder has a number of exhaust stages (and I wanted to see how many exhaust baths I could get), I divided the 1272 yards (320 grams) into 11 lots of 100 yards (25 grams) plus one lot of 172 yards.
I cold-mordanted the 100 yard lots in 8% alum and 7% cream of tartar (Note: all percentages are a percentage of the weight of goods being dyed). I set aside remaining 172 yards as an unmordanted, undyed control.
The madder I used for all these tests was pre-ground raw goods.
Round One: Clarifying Madder
The method: In previous dyeing projects, I had used too little madder to get a rich red, so I decided to use 100% WOG for this test. However, I had also read that madder would be more of an orange-red if not “clarified” (steeped and poured off). For that reason, I made a “tea” with the madder: I steeped the dyestuff in boiling water for 2 minutes and then poured it off into a pot. I repeated this once, and then used the remaining dye for my main dye bath. However, I also used the dye that was first extracted for a bath, giving me two dye baths. The dyestuff was removed before adding the yarn to the baths. All the goods were at minimum cold-dyed for 24 hours; many were heated or at least left in the hot summer sun for most of the day.
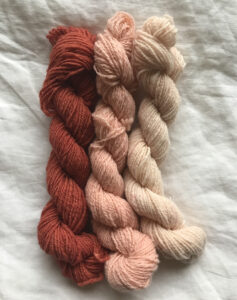
The results: The clarified bath only lasted for three rounds (two exhausts), while the “tea”-style extraction lasted for five (four exhausts). While the lots dyed in the extraction definitely have more orange tones to them, the red is also richer; the lots from the clarified dye, while less orange and more pink, are also less saturated.
Round Two: Playing with pH
Since I had 300 already-mordanted yards of merino left, and I knew that madder reacts in interesting way to pH changes, I decided to do a smaller pH test. In order to have more skeins for exhaust, I broke my yarn down into smaller lots of 20 yards (5 grams).
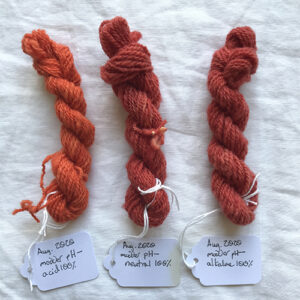
Dye and pH: I used 5 grams of madder in single-use tea bags, putting three packets together so that I could have acidic, neutral, and alkaline dye baths. To shift the pH, I used white vinegar for my acid and household ammonia for my alkaline. I aimed for pH 3 for my acidic bath, ~7 for my neutral bath (roughly my water’s regular pH), and ~10 for my alkaline bath.
I went through a lot of pH test strips during this experiment, as I tested the water of every dyebath at the beginning and end of each lot, at minimum.
As I was dyeing, I discovered I was having difficulty with the alkaline slowly shifting to neutral during the process. I believe this is because the cream of tartar in the mordant is an acid, and it started to neutralize the alkaline as the yarn was dyed.
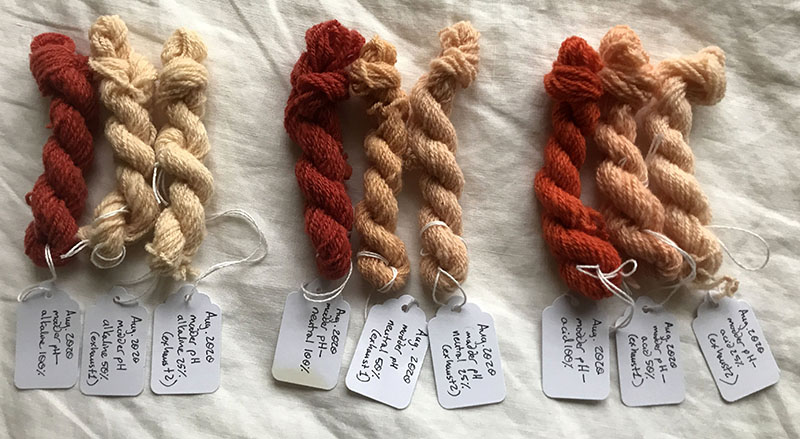
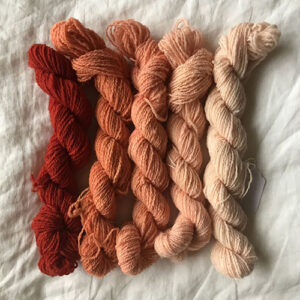
Results: I was incredibly surprised by the results! I was able to get three lots (two exhausts) out of each dye pot. While there were minimal differences between the first lot in the alkaline and the neutral (possibly due to the interference from the cream of tartar in the mordant), the differences really showed up in the exhausts. Because the first alkaline lot presumably absorbed more of the red parts of the dye, the exhausts were primarily creamy-yellows. The neutral had brownish-orange exhausts, while the acid (having absorbed more of the yellow in the first lot) had pinker exhausts. I quite like the pink exhausts, so there may be a number of bright orange-reds in my future, too!
Round Three: Some Weird Lots
By this point, I had done two experiments and still had 120 yards of mordanted yarn left — and already broken into 20 yard lots!
So, I dumped the remainder of the pH tests together, without adjusting the pH (it came out to 5 when I tested at the beginning). I only tracked one specific skein, though I used a couple to absorb the remaining dye; this gave me a red that was unsurprisingly close to my first neutral pH lot.
I also had frozen the dye packets from the original clarified madder tests. With these, I simmered them in pH-neutral water and chucked a small skein in, leaving the dye in during the whole dyeing process. I also originally shifted the pH to 11; pH had shifted to 8 by the end, but I ran out of ammonia for the second lot, so it slowly shifted back to neutral. This gave me a rich salmon pink.
Projects and Records
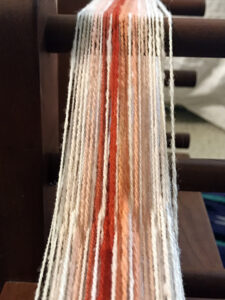
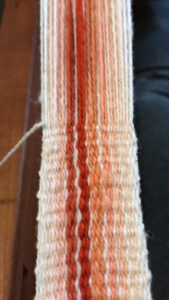
Of course, since I had spent so much time processing, spinning, and dyeing this wool, I also had to do something with it. So I inkle-wove two belts!
Both belts are woven with just the yarn from round one (clarified and tea-style extraction), as I had the greatest yardage of these. For the first belt, I did a gradient of light-to-light, with the darks in the middle(ish), with each band separated with a strand of white. For the second belt, I did a dark-to-dark gradient without separations, edged in white.
Finally, I used these experiments as an opportunity to test my planned format for the Great 2020 Dyeing Project Fade Test. I created a grid with the different dyeing experiments and exhausts with a space for a picture of the yarn surrounded by a border of color sampled from the dye lot itself; it also includes the hex code of that sampled color.
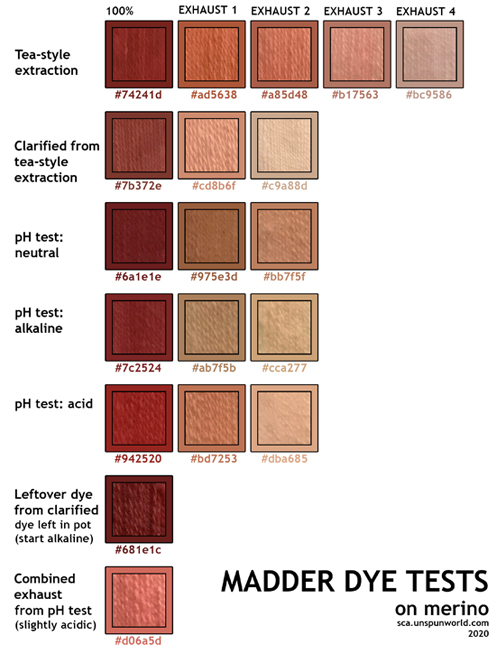
If you would like a PDF copy of this image, you can download it here.