Category: Fiber

Hood and Sleeves from ~1400

Displaying the accessories: a fashionable hood and sleeves

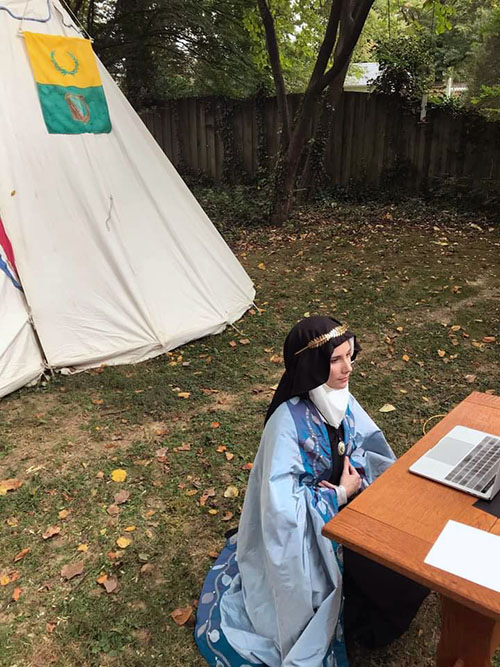
On occasion, I like to play around with 1350s-1425 England and France, and for New Year, I decided I wanted to record a reading of Gawain and the Green Knight in Middle English… but I didn’t have winter-appropriate garb. However, I had a little more of a yard of navy blue linen, and I had some leftover madder-red wool from Ysabeau’s cloak, so it was time to make some accessories!

Ms. fr. 119, folio 354v
Buttons and buttonhole close-up

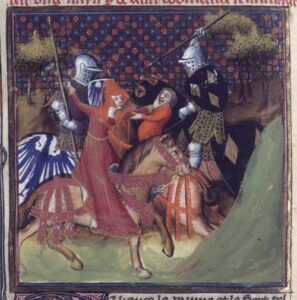
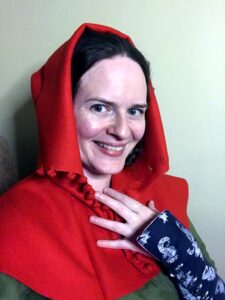
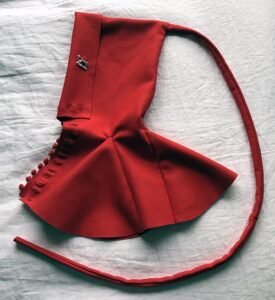
For the hood, I was inspired by a hood from a manuscript of the Prose Lancelot (Fonds Français 119, folio 354v). The woman wears a fashionable madder-red hood that projects forth from her face; I was a particular fan of the crazy-long liripipe. My pattern was modeled from a similar linen hood I made in a class several years ago, with adjustments based on advise from The Medieval Tailor’s Assistant  by Sarah Thursfield. All seams were hand-sewn with wool. Since the wool is tightly fulled, the edges are left raw, and I didn’t flatfell the seams. The liripipe was a particular challenge, as it was a tight pieced tube; instead of having a lumpy end, I simply cut the tip and left it raw.

Finished hood with crazy-long liripipe and a fashionable pewter badge

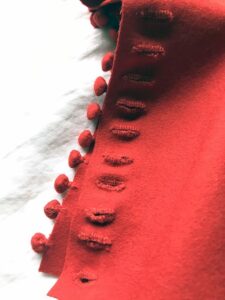
This was also my first time making  self-stuffed buttons, which with the thick wool was a challenge. I used silk thread to initially gather the buttons, as silk was stronger than my wool thread (which liked to break), but I finished each button and sewed it on with wool.

I discovered through the process that I quite enjoy making buttonholes! These were also a learning experience (I don’t remember the last time I handsewed one — if ever?), but each was a delight, and by the end they were getting pretty even.

Atlantian Spike and Roxbury Mill millcross

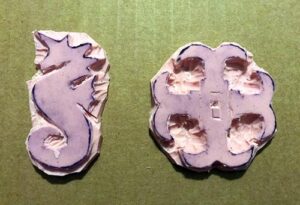
Other women in the same mansucript as my hood inspiration are wearing overdresses with short sleeves and long, knuckle-length undersleeves, which encouraged me to match the hood with some false sleeves. When I first bought this navy blue linen, I knew I wanted to make some Atlantian pride sleeves with spikes, so I also cut stamps for the first time! I used a Speedball lino cutting tool and carving block, which while not historically accurate are very user-friendly. I drew and cut an Atlantian Spike, and I also cut a millcross for my shire (for future usage); enjoying it way too much, I cut a second mirror-image Spike so I could print alternating Spikes.

Test prints on cardstock with acrylic paint

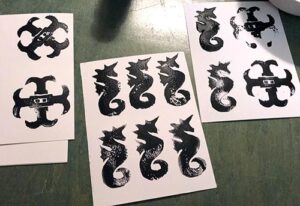
This was my first time printing fabric, and I have limited space, so there was some entertaining layouts on a bedroom floor with a yoga mat, towels, and way too many paper towels. I initially wanted to use silver paint, but the silver paint wasn’t pigmented enough to print clearly (and on a white linen test print ended up a dingy gray). After some trial and error, I landed on an undiluted white acrylic craft paint; I tried mixing the paint with a fabric medium, but it did not give a clear print. My printing wasn’t particularly consistent, but drastically improved in the process, and I’m looking forward to showing people where my printing experience began and ended while wearing these sleeves!

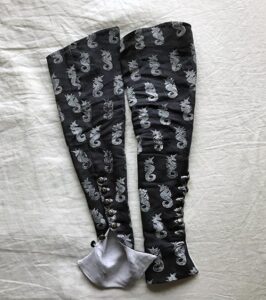
In making up the sleeves, I half-lined them just past the planned buttons so that I would have a contrast color when turning back the long cuffs. I cut them so that the cuffs just reach my knuckles, which is consistent with other sleeves I saw in the manuscript. The buttons are (appropriately) Spike buttons that were favors from previous A&S displays and competition, and I again enjoyed making buttonholes way too much. The linen was sewn and flatfelled with cotton, but the buttonholes were sewn with linen thread (the buttons were also sold on with linen). The final sleeves are skin-tight, and make me feel very fashionable!

Ugly Bands

In 2020, I started inkle weaving what I called “ugly bands.” This is a bit of a joke, as the work is actually quite attractive. However, I named them “ugly bands” because a significant amount of the warp is always yarn that was less-than-attractive in the skein form, whether it was a random color combination from a blending experiment, an uneven spin from a demo, or some chaotic combo of both. I combined these with a solid-colored narrower warp to unify the bands, and they all came out absolutely lovely. In the future, I hope to give these as gifts and largesse.

The Great 2020 Dyeing Project (The Madder Adventure)

The product of madder, water, wool, and time

Remember those 1272 yards of merino I spun? Well, after I finished spinning it, August was the time for its destiny: the Madder Adventure!

Fiber Preparation

Two lots drying after dyeing

Since I knew madder has a number of exhaust stages (and I wanted to see how many exhaust baths I could get), I divided the 1272 yards (320 grams) into 11 lots of 100 yards (25 grams) plus one lot of 172 yards.

I cold-mordanted the 100 yard lots in 8% alum and 7% cream of tartar (Note: all percentages are a percentage of the weight of goods being dyed). I set aside remaining 172 yards as an unmordanted, undyed control.

The madder I used for all these tests was pre-ground raw goods.

Round One: Clarifying Madder

Lots from the clarified bath
Lots from the “tea”-style extraction

The method: In previous dyeing projects, I had used too little madder to get a rich red, so I decided to use 100% WOG for this test. However, I had also read that madder would be more of an orange-red if not “clarified” (steeped and poured off). For that reason, I made a “tea” with the madder: I steeped the dyestuff in boiling water for 2 minutes and then poured it off into a pot. I repeated this once, and then used the remaining dye for my main dye bath. However, I also used the dye that was first extracted for a bath, giving me two dye baths. The dyestuff was removed before adding the yarn to the baths. All the goods were at minimum cold-dyed for 24 hours; many were heated or at least left in the hot summer sun for most of the day.

The results: The clarified bath only lasted for three rounds (two exhausts), while the “tea”-style extraction lasted for five (four exhausts). While the lots dyed in the extraction definitely have more orange tones to them, the red is also richer; the lots from the clarified dye, while less orange and more pink, are also less saturated.

All lots together

Round Two: Playing with pH

Mini-skeins get dyed in steins! Alkaline bath on the left, acidic bath on the right.

Since I had 300 already-mordanted yards of merino left, and I knew that madder reacts in interesting way to pH changes, I decided to do a smaller pH test. In order to have more skeins for exhaust, I broke my yarn down into smaller lots of 20 yards (5 grams).

First lot results: acid, neutral, alkaline (L-R)

Dye and pH: I used 5 grams of madder in single-use tea bags, putting three packets together so that I could have acidic, neutral, and alkaline dye baths. To shift the pH, I used white vinegar for my acid and household ammonia for my alkaline. I aimed for pH 3 for my acidic bath, ~7 for my neutral bath (roughly my water’s regular pH), and ~10 for my alkaline bath.

I went through a lot of pH test strips during this experiment, as I tested the water of every dyebath at the beginning and end of each lot, at minimum.

As I was dyeing, I discovered I was having difficulty with the alkaline slowly shifting to neutral during the process. I believe this is because the cream of tartar in the mordant is an acid, and it started to neutralize the alkaline as the yarn was dyed.

L to R: alkaline, neutral, acid

Results: I was incredibly surprised by the results! I was able to get three lots (two exhausts) out of each dye pot. While there were minimal differences between the first lot in the alkaline and the neutral (possibly due to the interference from the cream of tartar in the mordant), the differences really showed up in the exhausts. Because the first alkaline lot presumably absorbed more of the red parts of the dye, the exhausts were primarily creamy-yellows. The neutral had brownish-orange exhausts, while the acid (having absorbed more of the yellow in the first lot) had pinker exhausts. I quite like the pink exhausts, so there may be a number of bright orange-reds in my future, too!

Round Three: Some Weird Lots

By this point, I had done two experiments and still had 120 yards of mordanted yarn left — and already broken into 20 yard lots!

So, I dumped the remainder of the pH tests together, without adjusting  the pH (it came out to 5 when I tested at the beginning). I only tracked one specific skein, though I used a couple to absorb the remaining dye; this gave me a red that was unsurprisingly close to my first neutral pH lot.

I also had frozen the dye packets from the original clarified madder tests. With these, I simmered them in pH-neutral water and chucked a small skein in, leaving the dye in during the whole dyeing process. I also originally shifted the pH to 11; pH had shifted to 8 by the end, but I ran out of ammonia for the second lot, so it slowly shifted back to neutral. This gave me a rich salmon pink.

Projects and Records

First warp on the loom!
First warp in progress!

Of course, since I had spent so much time processing, spinning, and dyeing this wool, I also had to do something with it. So I inkle-wove two belts!

Both belts are woven with just the yarn from round one (clarified and tea-style extraction), as I had the greatest yardage of these. For the first belt, I did a gradient of light-to-light, with the darks in the middle(ish), with each band separated with a strand of white. For the second belt, I did a dark-to-dark gradient without separations, edged in white.

Finally, I used these experiments as an opportunity to test my planned format for the Great 2020 Dyeing Project Fade Test. I created a grid with the different dyeing experiments and exhausts with a space for a picture of the yarn surrounded by a border of color sampled from the dye lot itself; it also includes the hex code of that sampled color.

If you would like a PDF copy of this image, you can download it here.

A Mantle and a Poem for Iselda

Iselda during court, having received the mantle.

When I found out that Iselda de Narbonne was going to receive her Laurel, I may have demanded to make her mantle. I don’t know. It’s all a little fuzzy.

Due to life, the timeline on construction got a little tight, so the foundation seams were all machine sewn. However, every single visible stitch was hand-sewn, and the applique and beads were done entirely by hand. The fabric and thread is 100% silk. Every fabric used is a two-tone that shimmers when in motion, some more subtly than others. The pearls are glass Swarovski pearls.

I was asked to say something about the mantle as it was presented to her, but initially all I could think of was “A badass bard deserves a badass mantle, and I hope this makes you cry.” However, inspiration struck two nights beforehand, so I wrote her a poem that I read:

From sweet soil sprouts the laurel,
But limbs and leaves with labor grow
dewy drupes. Devotion and time
Furnished fruits fair to the ear,
Foliate and flourishing, brought forth
Verdant voices in choral concordance.
Now a mantle marks the mastership attained
Proclaims to peers: perceive this Laurel
with seeds of song to sow and nourish.
Amang ic seowede nihtlang ic sticode me foroft.
Æt þære wæfersyne wundormentles, þīn wopdropum ic ahope.

The last two lines, in Old English, translate directly to “While I sewed through the night, I stabbed myself often. At the spectacle of the wonder-mantle, I hope for your tears.” In other words, “I hope it makes you cry.”

Back of collar detail.

Center bottom border detail

Draped on a chair, from the back.

Draped on a chair, from the front.
Folded in half, draped on a sofa. Yes, it’s huge.
Iselda displaying the back after court.
Iselda displaying the front after court.

Spinning Merino

Several years ago, my friend Liz passed a washed merino fleece off to me. During summer 2020, I decided to finish processing it and spin it. The staple was quite short, so I decided to card it into rolags. Carding was a little difficult, because I didn’t have the right density of teeth in my cards, but by the end my rolags were looking pretty nice. I spun the rolags using a short forward draw, because it gave me a lot of control over the really short fibers.

The washed fleece (ignore the See’s candy in the background).

Pretty rolags and singles.

Finished singles.

1272 yards of finished, plied laceweight yarn.

Once the yarn was finished, I decided it was the perfect amount to split into smaller skeins for my madder dyeing adventure (coming soon!).

The Royal Bard Box Cushion

It’s hard being a royal bard during the midst of a pandemic. Online bardics aren’t quite the same. So, I decided to make something that would be the only tangible part of my tenure as the King’s Bard. The Royal Bard Box of Atlantia is a beautiful, handmade box that has earned far more ire than it deserves for its solid construction and the three-dimensional shell on the lid (which makes it heavy to carry, and difficult to stack anything on top of). It is, however, the perfect height for a stool.

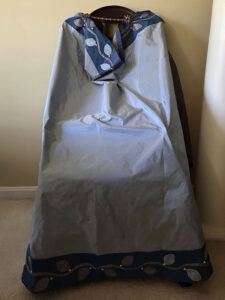
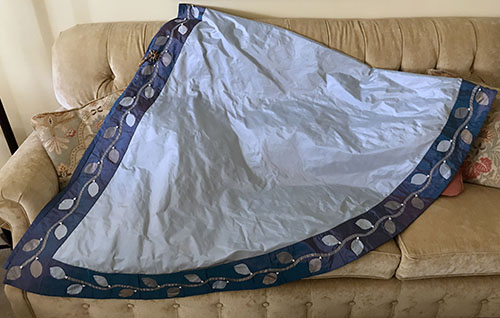
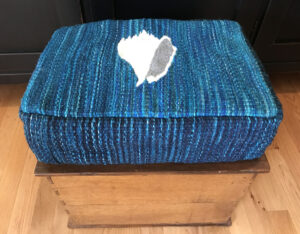
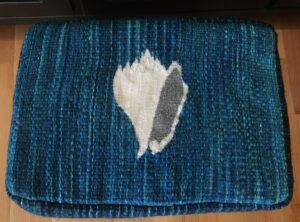
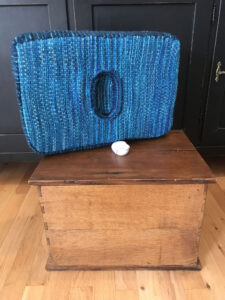
Therefore, I decided to weave a cushion for the box, with a cavity for the shell to fit into. Even if future bards decide not to use it as a seat, the cushion will allow other items to be stacked on top; it would also be a lovely place to set a guest of honor in a bardic circle.

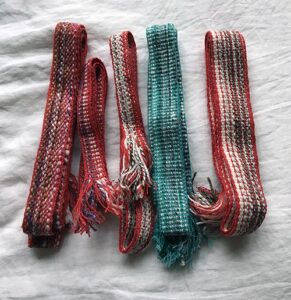
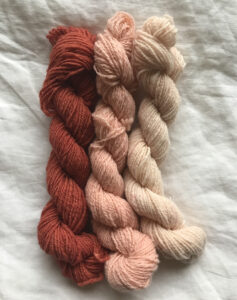
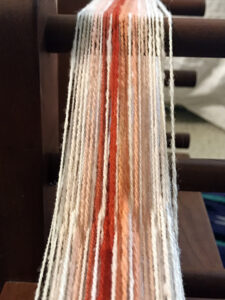
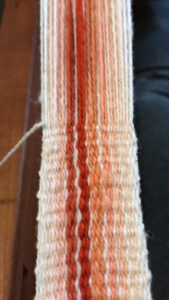
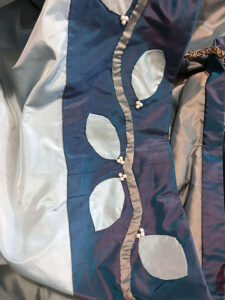
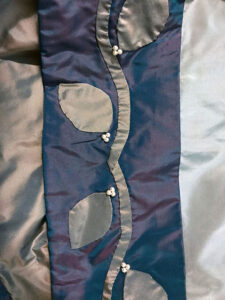
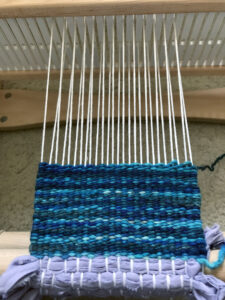
There’s a lot of memories in the yarn. The blue yarn was some of the first that I hand-dyed, in a flat in Scotland with vinegar and food coloring. I’ve had similar yarn in a sunny place for a while, so while I know it will fade, it won’t fade overly much. The grey yarn was some of the first I purchased as a crocheter (before I even learned to knit!), and the creamy-white was rescued from a charity shop in Scotland. The warp yarn is cotton that I purchased in a caravanserai in Istanbul. While it is difficult to tell in the pictures, the shell is outlined in silver, which I’m also currently using to embroider a banner. The entire cushion was woven using tapestry techniques on a rigid-heddle loom.


Spinning for a Vigil Shawl

In addition to sewing Mistress Ysabeau’s Laurel cloak, I spun the wool for her vigil shawl. Ysabeau has made several vigil shawls for other people, so my friend Lucy (Lucy of Wigan) and I decided that we must make Ysabeau her own. Unfortunately, I don’t have any pictures of the yarn-in-progress. The wool was off-white merino from Paradise Fibers, and it was an utter delight to spin. Once the yarn was spun up and washed, I threw together a simple triangular shawl pattern, did a tab cast-on, and passed it off to Lucy to knit. Once she was done with her beautiful knitting, we blocked it together.

In-progress picture from Lucy

Finished shawl before blocking

Ready to be presented!

Mistress Ysabeau’s Laurel Cloak

Photo by Lady Adelaide

When Baron Hamish MacLeod found out that his wife, Baroness Ysabeau ferch Gwalchaved, was going to be surprised with her Laurel at Bright Hills Baronial Birthday in February 2020, he asked me to create her Laurel cloak. Now-Mistress Ysabeau is a spinner, weaver, and sewer who handsewed garb for one of her first events 32 years ago (in a time and place when handsewn garb was actually looked down on — how far we have come!) so I knew I had to pull out all the stops I had.

Read more

The Spinner of Fate (Clotho)

Photo courtesy of Kaaren Valravn

At some point in the murky past (that is, 2019), Kaaren, Adelaide, and I made a joke about how we’re the three Fates. I am, of course, the spinner Clotho, Adelaide the measurer Lachesis, and Kaaren the inflexible/cutter Atropos. When we discovered that we all had bought (or wanted to buy) the same grey linen, we decided to make Fates-themed garb in our preferred styles (we also managed to be chronological as well!). For a deadline, we set Twelfth Night 2020.

Because I was doing early period English, I felt a little guilty that my garb wouldn’t be as complicated and require as much hard work as Adelaide and Kaaren’s. So I decided to make everything I wore.

Everything.

I already had shoes, anyway.

Read more

The Great 2020 Dyeing Project (Fade Test Part 1)

After taking a class on natural dyeing using different yellows and indigo in May 2019 at Maryland Sheep and Wool, I decided it was finally time to dye the Romney fleece I bought in 2017. However, I wanted to test sun-colorfastness first, as I had noticed some garments that I dyed with commercial dyes were fading significantly after 2 years of SCA wear and washing.

I decided I wanted to test weld, madder, and indigo (the great triumvirate of medieval dyes) plus cochineal; I also wanted to test these dyes in combination.

Read more